Inside the Darkened Box: Using the Camera Obscura to Investigate the Painting of Vermeer
While visiting Rome some years ago I had the opportunity to study several Vermeer paintings in the exhibit at the Quirinale. They were part of a larger show called “Vermeer and The Golden Age of Dutch Art” and although there were some other fine pieces in the exhibit, the Vermeers outshone the others. They seem to glow from within and the accuracy of the perceived space is extraordinary. The room he most often depicts is perfectly captured in perspective and the figures inhabit it easily. The paintings are bright and clear, with an almost enamel like surface, mostly small in size and intimate in scale. There seems to be no searching for form on the artist's part, just near photographic perfection. And yet they could never be mistaken for photographs as some modern realist work can be, they read as paintings. We understand this immediately even from across the room.
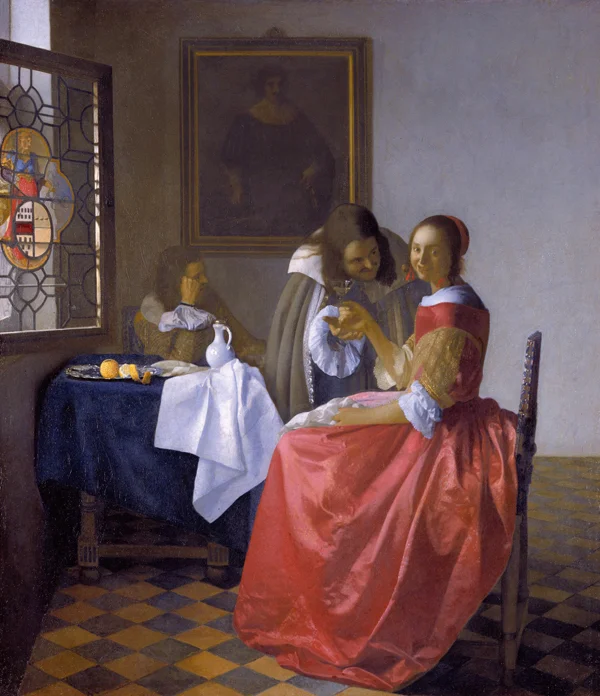
A few of the works were new to me, such as "The Girl with the Glass of Wine", from the Herzog Anton Ulrich-Museum, Brunswick. The sense of the light entering the room from the open window is enhanced by the glowing arrangement of vase and fruit on the table top. The scale of this still life reads correctly for the space and we may fail to notice how it has been reduced slightly in size compared to the forward figures. The neutral grey in the figure of the man behind, seated at the table, draws him back into the depths. So with perspective and loss of chromatic integrity the space pulls back away from our eyes and it is done so subtly that we barely notice the artist doing it. We register receding space instead of surface. The precision of the forms and the control of the color make Vermeer's work magical. He paints without revealing his secrets.
Johannes Vermeer has captured modern interest not only for his dreamy women engaged in mundane tasks but also perhaps due to the mystery surrounding his life. We know little about his training, his personal life or his methods. Art historians widely agree that Vermeer used a camera obscura in his painting process. The exact method may never be known but many people have investigated the possibilities to varying degrees of complexity. Philip Steadman wrote a book called "Vermeer's Camera" in which he postulates that a lens was held in the wall of a large box and that Vermeer sat inside the box where a projection of the room would have been cast on the back wall. [1.] Steadman worked out the dimension of the room depicted in much of Vermeer's oeuvre and found that many of the paintings were the exact sizes that coincide with their projection onto the back wall of the studio. His work was stimulating and it raised some questions that I wanted to investigate. Just what does the camera obscura contribute to an artist's vision? What might Vermeer have learned from using it and does it constitute a form of cheating as some have implied? Did the camera simply suggest a way of seeing or was there a more mechanical advantage: did he trace the images or find another way to transfer them?

I teach at The Aegean Center for the Fine Arts in Paros, Greece. We are a classically based school teaching studio arts, photography, creative writing and Greek literature. I often work with second term students on special projects studying master works. After seeing and studying that Rome exhibition I suggested we put our energies into discovering what makes Vermeer unique. His subject matter is neither original nor particular to him. His power lies in his method. My students and I experimented with the idea proposed by Steadman that Vermeer in some way worked directly from the image projected. The first step was building our own camera obscura which would enable us to trace the steps of Vermeer. I had no idea what we would discover but I was sure we would see a new world.
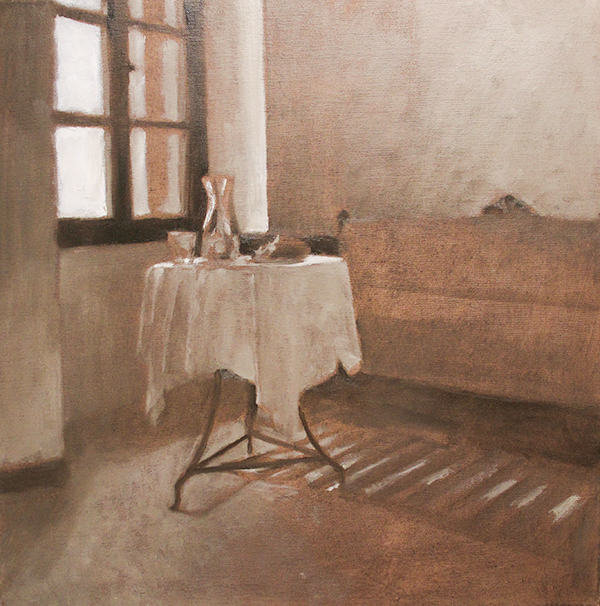
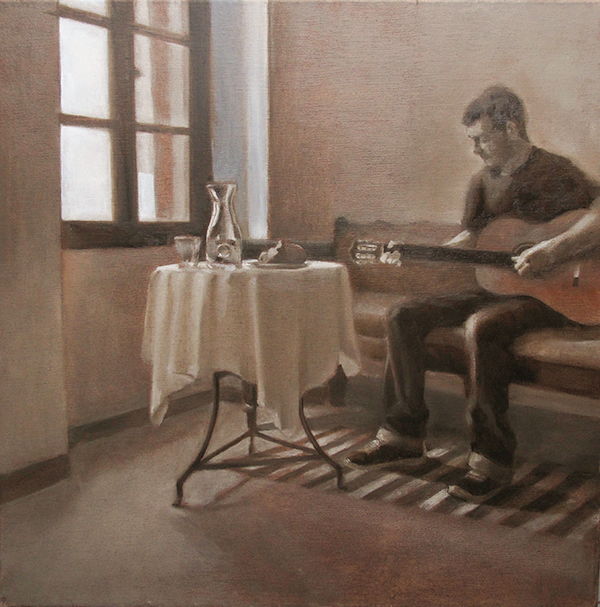
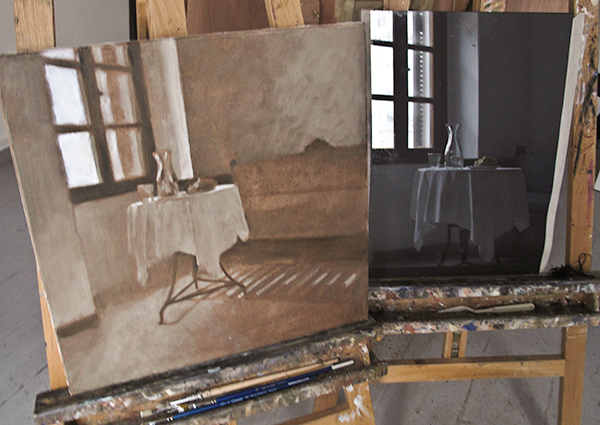
Our first camera obscura.
We did some preliminary toying around with a magnifying glass and a black tent pitched over easels to get a sense of what a lens will do. Steadman suggested that Vermeer might have had a ten cm double convex lens. I had several magnifying glasses that seemed to fit the bill and that I wanted to try out. By allowing the light to enter a darkened space through a lens you get a projection of the outside world, upside down and backwards. When we determined that an image could indeed be projected I built a small room out of PVC pipe, just large enough to hold an easel, and covered it in cardboard and black cloth. This served as our camera obscura. The magnifying lens had a very short focal length, only inches away from the lens. We needed more distance if we were going to trace the image onto a canvas. After some reading on the Internet I discovered that we needed a lens with a low number diopter and that eyeglasses have appropriate focal lengths. The local optician was kind enough to allow me to try many lenses until I found one that was correct and which would focus within the range that our box required. We used a +1.75 for our first set up. (Spectacles were readily available in the 1600s and Holland was producing quality lenses.) [2.] [3.]The new lenses gave us a beautiful, colorful rendering of our still life. It already resembled a painting in many ways with soft focus and clear jewel tones in the lights. We were all enamored with the glowing image. I tried tracing it with my back to the lens, the light coming over my shoulder and the canvas held vertically on the easel. With that easily accomplished it seemed an obvious next step to see if we could paint directly onto the projection as the crucial element of color was missing.
We built a wooden jig to hold the canvas in place on the easel inside the camera obscura, as it needed to return to that exact position after working on the canvas outside of the box. There were some problems, skewing of the image being one. This was quickly resolved by using a grid marked on a separate piece of paper held to the canvas to see that horizontals and verticals were aligned. Angling the easel fixed this issue. The edges of the circle of focus tend to curve the perspective but this was rectified once outside the camera with a square and ruler. The image was drawn into focus by scooting the easel forward and back. Inexperienced painters might object to the loss of tight focus on parts of the image but this is the equivalent of squinting the eyes to see the big forms, a trick artists learn early in their careers. With a jig to hold the canvas in place it is easy to go back and forth working on the canvas both inside and outside the box.
Click to Enlarge
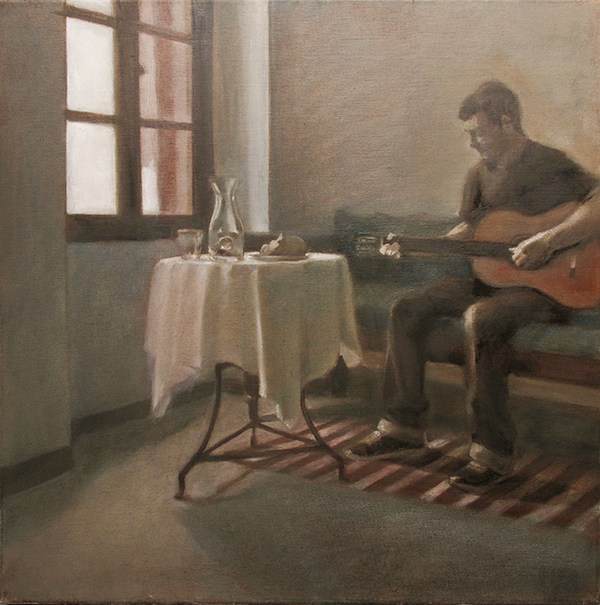
We used a mirror placed outside the camera at 45 degrees to the lens to reverse the image right to left because I thought we would need to see the real still life to paint from at some point and the lens naturally reverses the image. This proved unnecessary but I didn’t know that at the time.
Click to Enlarge
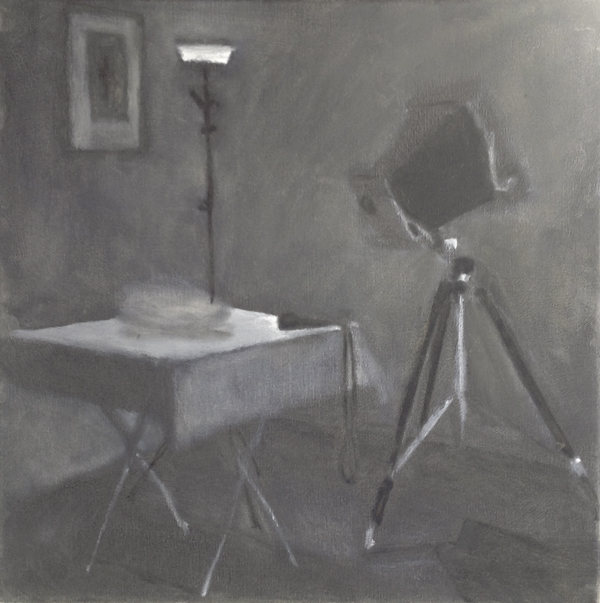
We found that inside the booth the light coming in was adequate to see the palette and place tones. There is no need for tracing lines around the image. Although you are seated in the dark the lens brings enough light in and your eyes adjust after some minutes. Following traditional methodology we applied five tones directly onto a toned ground, moving from the extremes of black and white and then locating the middle three. It was not difficult to find and apply the tones even though the image was in color but my advanced painters had experience using the five tone range before. We took extra time to blend edges and smooth gradations. It is necessary to check your work against the projection occasionally which we did by turning on and off a light inside the booth. Later I found that the difference in the warm temperature of the light and the cool outside light was too divergent. I solved this by simply pulling back the curtain to allow the natural light to fall on the work. Doing this allows you to see what you have accomplished and what is still lacking. As the paint accumulated on the canvas it became difficult to judge the tone we were applying. We were seeing the colored light of the projection in combination with the paint. This was overcome by holding up a white card to the canvas, noting tone and then lowering it, working from memory.
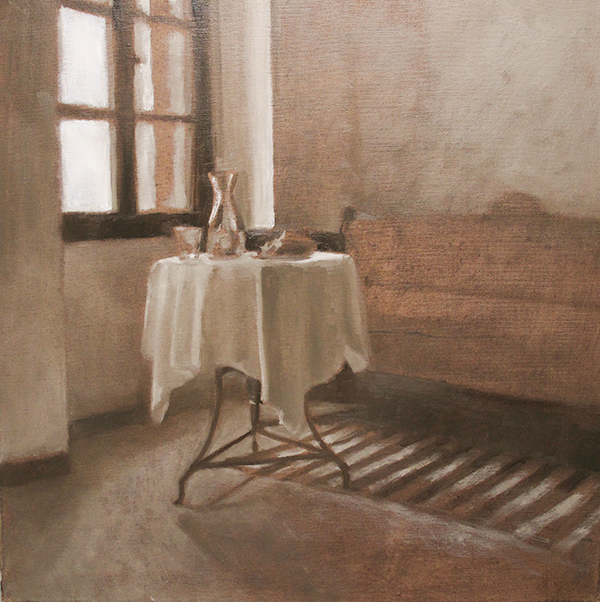
The extraordinary discovery was that a very credible image can be made, despite working in the semi darkness, despite working on a fully colored, upside down image, despite the lack of a preliminary tracing. I was thrilled to see the results, though each student had individual differences in handling and application, the paintings were all very beautiful, correct and nuanced. The next step was to add color once our underpaintings had dried. Again, working entirely inside the camera obscura, we mixed and applied color. The palette was prepared outside the camera mixing a range of tones and using the colors suggested by the projection which is not necessarily the same as those you would see directly. There is a harmonizing and coalescence of color which happens with the lens which turns the projection into a cohesive image. People remark that the projection already looks like an oil painting.
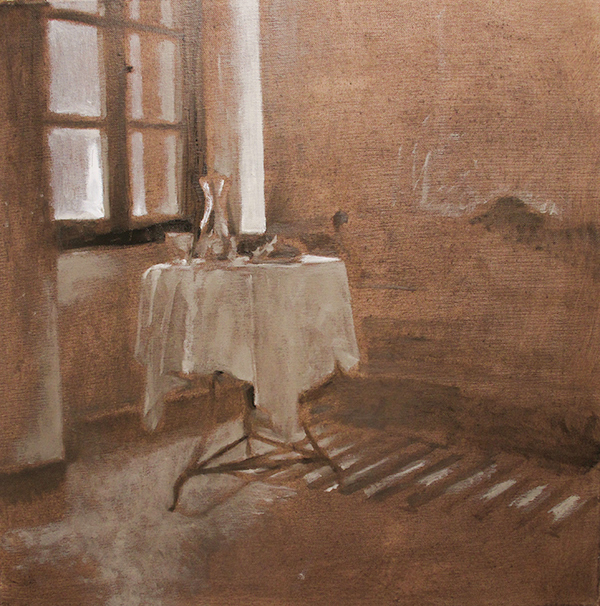
After studying Vermeer I noted that many of his tones are neutral, darks are mostly without color, half tones are quite grey, and only lights have true bright color. This matches what we perceive of the projection. Highlights are obviously colored yellow or blue, gradations are very soft, contrasts are muted. Selecting a very limited palette of raw sienna and cobalt blue, with just a touch of cobalt violet (plus black and white), I matched the underpainting’s tones and scumbled on color very lightly. My application of the colors, once viewed in daylight, was too colorful. I went back in a second time and added greys, warm and cool, softened transitions and added transparent color glazes into the darks. The feeling of cool light this gave was more northern in feel, the greyed out colors were more photographically ‘real’. The process is somewhat demanding, light off and on, white card up, down, staring at the image, mixing color, all in the half dark. But it goes fairly quickly nonetheless. The results convinced me that further work with the box would yield worthwhile results.
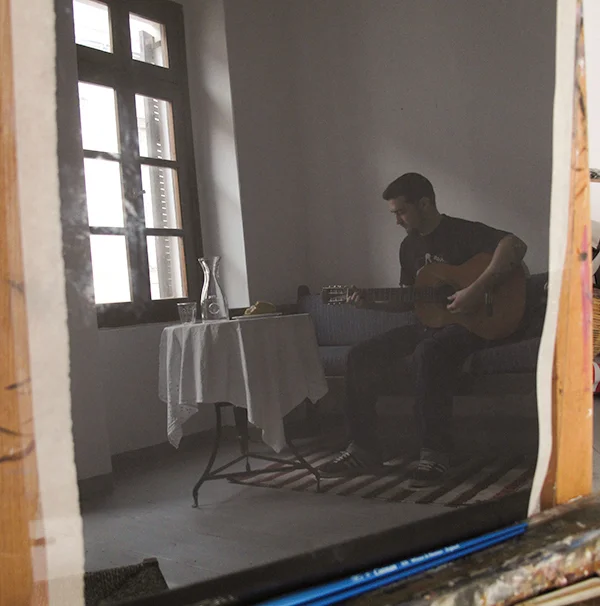
Unedited image of projection from within camera (just flipped 180 degrees)
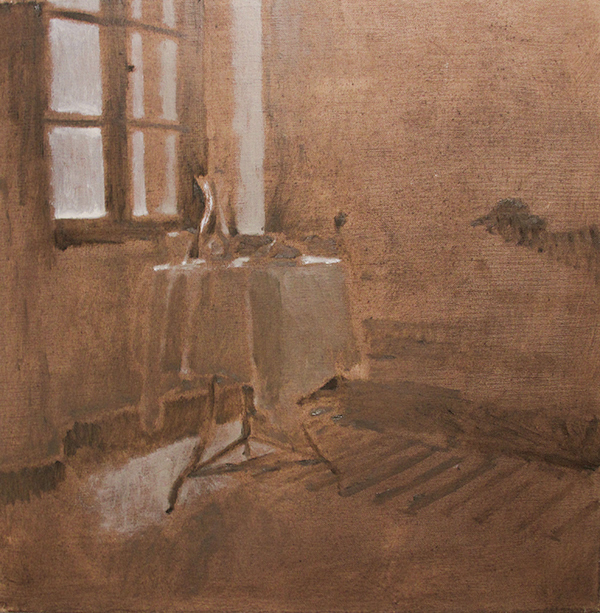
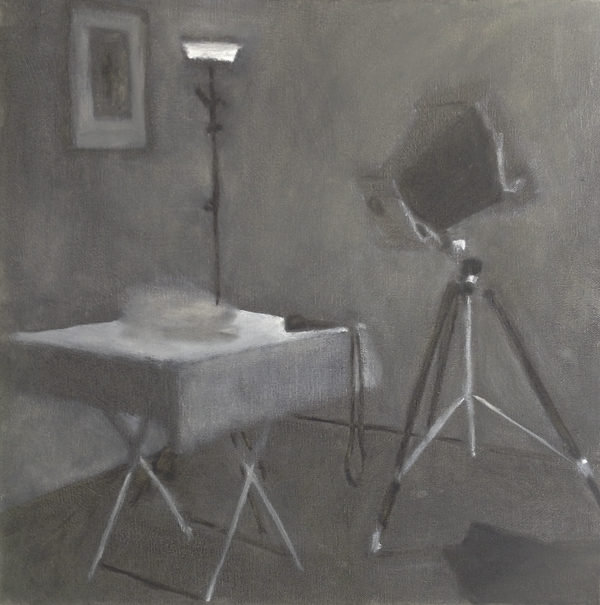
First painting from the camera obscura painted entirely inside the box.
Following up on these first investigations I began a series of paintings using the camera obscura this fall. My discoveries may be of interest to painters and Vermeer aficionados. I am not trying to make imitation Vermeers. My handling of paint is very different from his, in general I am more of a draughtsman. I am not a scientist nor an optics expert. There have been others who have painted inside a camera obscura with more rigorous investigation into the working of the lenses and focus. Recently I found an article by Carsten Wirth which goes into great depth about constructing an apparatus to focus and flip the image.[4.] Perhaps I would not have tried the experiment had I found the article earlier as his camera is quite elaborate and a bit intimidating. I went with the basic idea Steadman proposed and made my own discoveries. (Although my photographer husband assured me that he could have built a mechanism which would have resembled his own 8x10 camera and would have allowed for better focusing.)
Many critiques I have encountered which oppose the idea of Vermeer using the camera obscura concentrate their argument on the lack of focus the lens produces. At first I also felt this would cause me problems as the edges of the image are blurred and drop into grey haze. Also the depth of field is very narrow and any attempts to close down aperture resulted in very dim images. In practice however the lack of focus is not an insurmountable problem. Different lenses can be used for foreground and background objects and although this causes the sizes of the objects to shift that can be accounted for in composing the picture. Also, the lack of focus can often be used to encourage the eye to notice particular passages of paint and to keep others areas secondary. Artists have used this device for centuries to direct the viewer's eye. Vermeer frequently drops the lower quarter to a third of the canvas into unrefined darkness. The center of his canvases are the most highly colored and defined. This corresponds with the image the lens sees which drops off into grey outside the central area, vignetting the scene. [Leonardo da Vinci, who one thinks of as the most faithful observer, leaves many sections of his paintings underdeveloped. It is strange how little one notices omissions. The hand of the angel on the back of the baby figure of Christ in the Madonna of the Rocks is a blur of lines, hardly a hand at all. All his energy is directed in areas he wants you to notice.]
The projected image is bright enough that one can use only natural indirect light. Because the projection is a living image and not a photograph it changes with the passing of time and weather conditions. On cloudy days the light is different and color temperatures shift but I do not use artificial lights in the studio. I just have to wait sometimes for the sun to return.
Another issue often discussed is that of working on an inverted image. Again this is not a problem in practice. My main emphasis in teaching drawing is the importance of learning to release the left brain's hold on our perceptive capabilities. The left hemisphere is verbal and logical. As long as we rely on naming and categorization of objects as symbols we lose the ability to see objects as pure form. Many students draw symbolically; the arm for instance as an elongated tube, despite the fact that it may be radically foreshortened on the model. To get a student to "see" without this interference of symbol has always been the task of art teachers. Working on an image upside down releases this left brain dependency. These ideas were developed by Betty Edwards in "Drawing on the Right Side of the Brain.[5.]
I have an exercise for my painters which involves working with pastels from a slide which is projected upside down and very out of focus. I use a figurative picture which has a clear structure. Slowly over an hour the slide is brought into focus and the students refine their blocks of color to match the image they see. This provides them with a valuable lesson in beginning without details, working from large areas of color and tone to smaller refinements. As the image becomes coherent many do not see the figure for quite a long time as they are caught up in the pure shapes. Once they do see it, usually with a gasp of shock, it becomes much more difficult for them to continue to work on it upside down. The slash of color has become a face and they try to make the features. Our left brain, content with naming the object, now becomes impatient with observation. This exercise is valuable to teach students to feel the right brain's ability to extract abstraction of color and tone which is such a necessary task for the painter. I strongly feel that working upside down and in semi darkness are necessary components to this method with the camera. Working on the upside down projection allows for an accurate rendering without interference from our knowledge of the subject or our habitual handling of form. Lawrence Gowing describes something like this phenomenon in his monograph on Vermeer. He writes that Vermeer simply transcribes light and shade in his subject, with no underlying drawing. My experience inside the camera is exactly as Gowing notices:
"The description is always exactly adequate, always completely and effortlessly in terms of light. Vermeer seems almost not to care, or even to know, what it is that he is painting. What do men call this wedge of light? A nose? A finger? What do we know of its shape? To Vermeer none of this matters, the conceptual world of names and knowledge is forgotten, nothing concerns him but what is visible, the tone, the wedge of light." [6].
Human perceptions are such that we make sense of the world by delineating form by boundaries that often do not exist. Our survival depends on the ability to define an object from its background, a tiger from the grass. But this edge awareness defeats drawing skills and cuts out the figure from the ground. We must unlearn this skill to draw well. The beginning draughtsman puts a line around a curved object thus flattening it into a cartoon. The experienced painter learns to blend and suggest, bringing the forms out of the middle ground and pushing back the space behind. There exists a plethora of studio tricks to accomplish this, most of which get passed from teacher to student incidentally. The baroque method used heightening with white and glazes, the impressionists used broken brush stroke. No painter translates an exact dot for dot representation of life into art. Vermeer made choices based on the optical limitations of the lens. It is often the limitations themselves which spur the creative force.
Layering oil paint reaps the benefits of its nature in a way that flatly placed color cannot. A warm imprimatura, or colored ground, with scumbles and glazes has a completely different feel than continuous opaque surfaces. It is clear that Vermeer understood this as you can see his layers of paint on close inspection. His process was probably not so different from the painters from whom he is a direct descendant. Rembrandt was the teacher of Carl Fabritius who lived and worked in Delft at the same time as Vermeer. They certainly would have known of each other. The many golden glazes in Rembrandt's work lend depth and dimension to his work. Vermeer would have been familiar with the process of imprimatura followed by monochromatic underpainting layered with glazes and opaque lights. I am essentially following this same method. Very little pigment is necessary and the earth colors do the majority of the work with the brighter colors coming at the end.
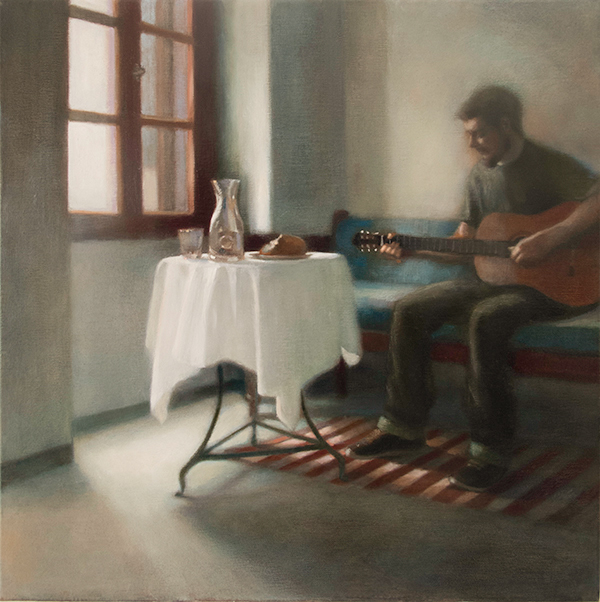
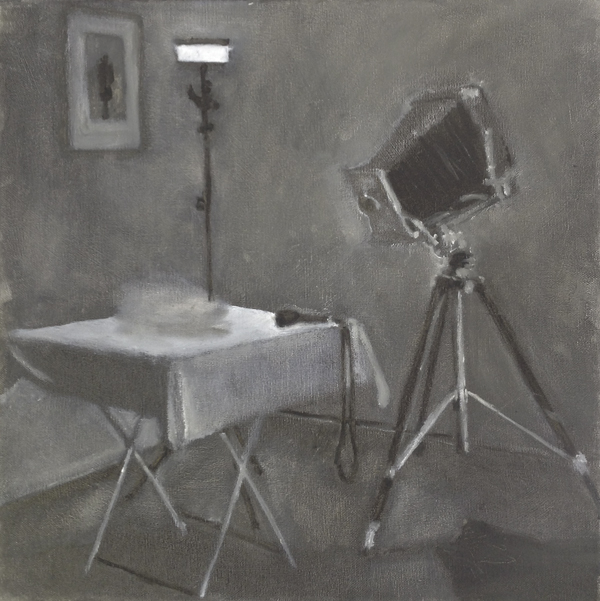
The colors in this still life were placed while inside the camera obscura.
The essential working process is this: starting on a mid tone imprimatura, I place the lights and darks with five premixed tones. Leaving the camera the canvas is corrected for perspective errors, generally the horizontals are correct but the verticals tend to curve. I straighten these lines with a square and ruler. Any missteps are softened and blurred and some areas strengthened. Here visual recall of shapes and forms is in play as you remember what you saw and reinforce the messy or missing bits once outside the camera. This may take two or three trips in and out of the camera. After this underpainting is dry I return to the box, place the canvas in the jig so it returns to the exact position and now think about color. The mixing of color may seem a difficult task in the dark. However, once the fewest possible pigments that are required to achieve the overall color scheme are selected then it is not difficult to find the tone, temperature and intensity for each area. I generally make one color which I need, say a dull blue gray, and then find every place on the canvas that it appears and daub it on. It is a simple exercise to then move to another hue and go through the process again. After a dozen or so mixtures are used this way the picture begins to form and it can be checked in daylight outside the camera to see the progress. It is necessary for your eyes to adjust every time after revealing the light from outside so to save time I became quite adept at working fairly instinctively. Also knowing your colors and understanding how to extend them thorough their range means that you can work in the darken box for quite some time. I can make, for instance, a duller, warmer, or paler tone without needing to see the palette in open daylight. Daubing the paint is more effective than using long brush strokes as the most difficult aspect of this operation is to see how much paint is coming off your brush.
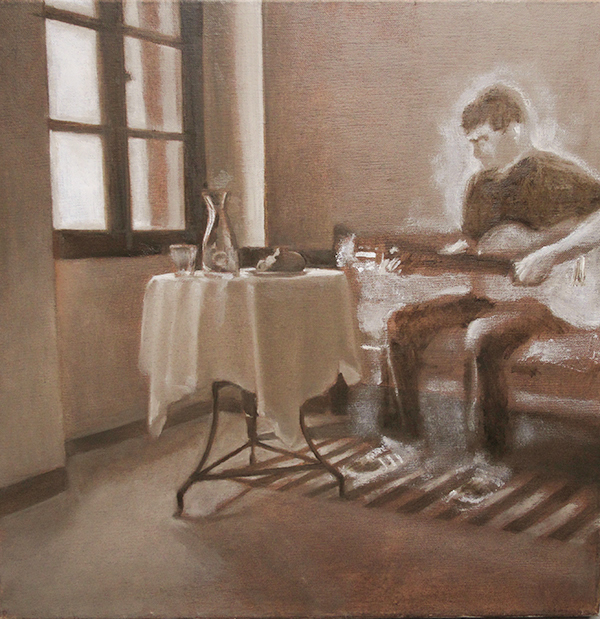
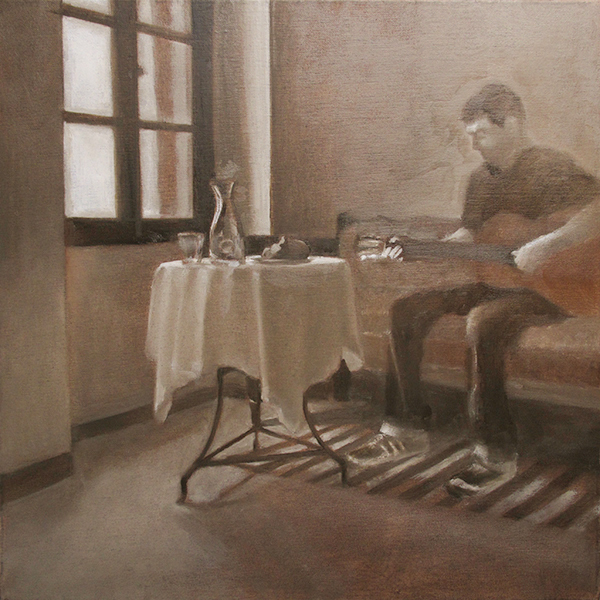
An example: painting a figure in an interior means that the figure can be quite small and the head may only be around 6 cm square. Inside the box it is very difficult to aim a small daub of pinkish white onto the bridge of a nose and hit the exact spot with the right color and the right edge control. But having tried, it is easy to remember the shape and tone and repair any misses once outside the box.
Visual memory is a crucial part of any painting process. We look at our subject, we turn to mix paint and we place it on the canvas, glancing and comparing as we go, momentarily recalling the shape and color of what was just before our eyes. In the box the same moment of translating occurs as we see the image on our white card then lower it to apply the paint to the canvas. There is an additional resurgence of these stored observations once outside the box as we recall what a particular smudge was meant to represent that now needs clarification. Because you are working upside down the translation is very direct, a smudge is just a particular shape and tone, but not also an object. A dark spot for instance is just that and not also a shadow under a nose. Working on just spots of color caused one of my students to exclaim that this was "boot camp for the right brain". Again, the right brain being the hemisphere that works on pattern recognition and has no need of names.
I eventually evolved two ways of working with the camera. With the first trial I felt sure we would need to view the still life directly and so I used a mirror to reverse the image before it entered the camera by placing it at a 45 degree angle to the lens. As it turned out we never sat directly before the subject as all the work was done inside the camera. When I began to do a figure I realized that the time required would preclude this method as the model could not hold still long enough. My students had been experimenting with capturing a likeness and had discovered that after twenty minutes or so the model frequently allowed the head to droop or twist and then the registration was off. (They had found it easier to have the model directly in front of the box, and not reflected through a mirror first due to the set up we had.) Without using some sort of Victorian photographic head brace we would need to come up with an alternative. I had been painting earlier in the year from a black glass, a sheet of glass with a black paper behind it used to reflect the subject. This is a studio aid frequently employed to show the modulation of tones. With the unaided human eye it is difficult to pick out the shifting of tones on a white wall, the difference in tone of a shadow on an apple to one on a pear, and the comparison of red to blue in tone. The black glass strips color out of the image, pushes half tones into darks and allows us to make easier comparisons of tones in different colored objects. In other words it defeats some subtleties of human vision thus bringing it closer into the realm of what oil paint can do. It occurred to me that I could come out of the camera with a fairly close rendition of the figure within an hour and a half, thus not pushing my model's patience too far. Then setting up the black glass to reflect the model I could work into the image and the model could squirm without causing mis-registration. This meant I no longer reversed the image going into the camera with a mirror as I no longer needed it flipped afterwards. Also, the black glass recorded something similar to the camera which made the transition less jarring. So sometimes I use a mirror to reverse the image coming in and then I work directly from the motif outside the camera. At other times I eschew the mirror and then use the black glass once outside the camera to view the motif. (I recall reading that mirrors in Vermeer's time were made with silver backing and therefore likely to tarnish and turn dark. I have an old mirror which gives this cloudy effect and mimics the camera image in its lack of focus and lowering of tones.)
A knowledgeable painter uses few colors and works within relationships established early on in the painting process. The imprimatura, a colored ground, for instance gives harmony and glow if allowed to remain in places. The artist knows what each pigment will do when brought up with white or when used transparently as a glaze. Intense colors are reserved for the last layers after forms are established and the composition is fixed. My experience with the camera obscura shows me that only an experienced artist can take full advantage of this process. Every application of the brush to the surface is one choice of many possibilities. What the camera obscura gives you is a vision to follow, depending on the selection of subject and light, a rendering which is one way to see the world. It does not magically recreate the image for you.
What the camera offers is an effortless map of the size and scale of objects, a correct perspective reading of the room and a unity of the image. The ease of finding the forms and perspective go a long way toward giving the image veracity. If the shape is right then the tone is easier to see. The projection saves time that would be spent drawing out the space and finding the proportions. It also clarifies nuances of vision that the human eye has difficulty seeing, such as the exact relationship of near to far objects. Perspective is steep and the human eye tends to pull all objects closer than they really are. These exact relationships lend verisimilitude to the image. The lens also gives the artist a unified vision of color which creates harmony that the human eye does not always find. The neutral tones link areas and unify space. I can see by my own growth in understanding that the process is training my eye and hand and I am curious to see how this project will affect my future work. I have been more of a draughtsman relying on line to solve visual problems and this method is just the opposite, relying on spots of tone only. It has also taught me much about the use of color, its potency if restrained in use, the use of selective focus, the beauty of grey. I don’t think I am any closer to answering the final question of whether Vermeer painted inside of a darkened room but I have certainly understood that it would be possible to do so.

Steadman's book gives an excellent history of the camera obscura and its development in Europe, discussing in depth the likelihood that Vermeer and his contemporaries were aware of its advantages for the artist. There is no doubt in most historians' minds that Vermeer used a lens in some form or another. My contribution I hope will be that of a trained artist seeing the possibilities of how to mix color and apply paint in a convincing way inside the darkened box. I believe that the camera obscura teaches the artist to see color and form without prejudice, without the left brain interference which straightens and strips nuances of vision in favor of reading for meaning and clarification of object boundaries. Working on an image upside down and in the dark allows the mute right brain to find pattern and color, and combining that with the painter's craft produces a unique vision of forms in light.
I plan to do more work with the camera obscura and continue the investigation into its influence on my vision. If Vermeer worked with this process he would have seen the advantage of the correct perspective given by the camera, the accurate diminution of forms as they recede, the greying of color, the precision of complex forms in space. But none of this takes away from his genius to combine these elements into unforgettable works of art. His patience and vision are clearer to me as I paint inside the darkened box.
I want to thank my husband, John, my son, Gabriel and my students whose interest and enthusiasm inspire me, especially Eleni Fokianou, Alisha Mehta, Dindin Africa Cruz, and Erin Jones who participated in the Vermeer Project.
[1.] Philip Steadman. Vermeer's Camera. Oxford University press 2001
[2.] Giuseppe Molesini , The Optical Quality of Seventeenth Century Lenses. Max Planck Institute for History of Science. Wolfgang Lefevre ed. Inside the Camera Obscura-Optics and Art, Under the Spell of the Projected image, 2007 Web. January 2014
[3.] Tiemen Coquyt The Camera Obscura and Seventeeth Century Optics, Max Planck Institute for History of Science. Wolfgang Lefevre ed, Inside the Camera Obscura-Optics and Art, Under the Spell of the Projected image' 2007. Web. January 2014
[4.] Carsten Wirth , The Camera Obscura as a Model off New Concept of Mimesis in Seventeeth- Century Painting, Max Planck Institute for History of Science. Wolfgang Lefevre ed Inside the Camera Obscura-Optics and Art, Under the Spell of the Projected image' 2007. Web. January 2014
[5.] Betty Edwards,Drawing on the Right Side of the Brain. Penguin 1979
[6.]Lawrence Gowing. Vermeer, Faber, London 1952

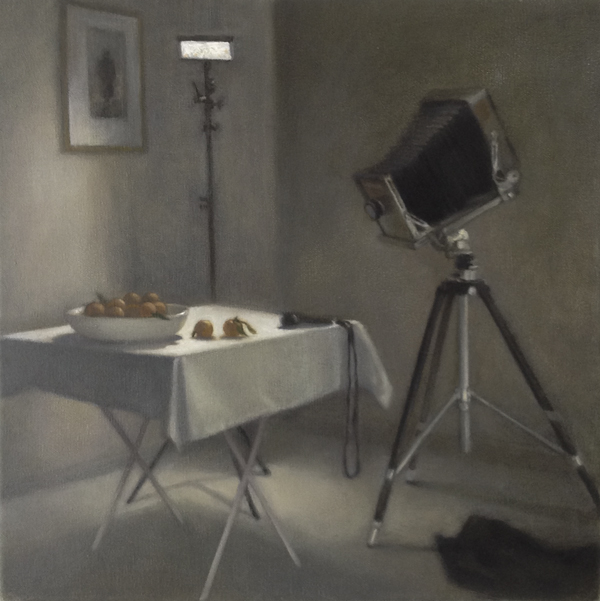
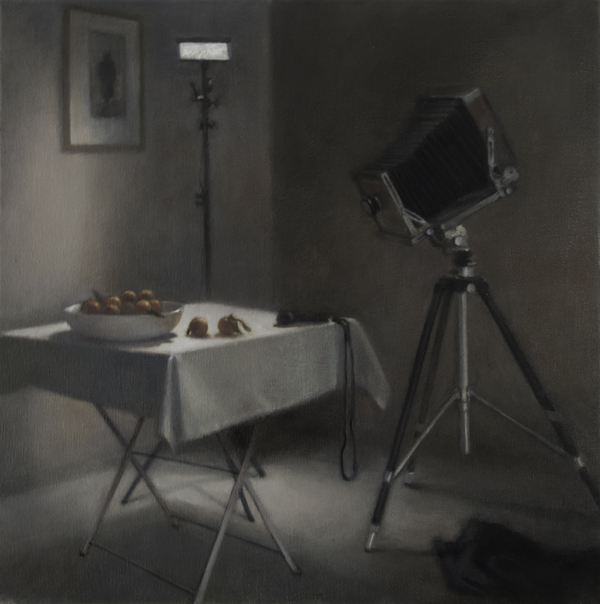
My new wooden camera obscura. It moves on castors, thus easily repositioned. It also has a moveable front lens standard upon which I can fit lenses of different focal lengths and speeds. Inside you can see the jig to hold the canvas but it can also accommodate a studio easel.